


Using a Custom Webpack configuration in an Ionic 4 Application
A default Webpack configuration is quite helpful. There are many processes handled for us out of the box and they are designed by the best pro in their domain.
However, sometimes it's not enough and we need to make some small changes.
In Ionic 3 we used to pass the path of the custom configuration in the package.json file. But now, we are in Ionic 4, which uses Angular 6!
This process is a bit more complex, there are no more simple properties to use and the ng eject command is undefinitely disabled.
Angular 6 now uses builders and schemas. A builder will use a json file named schema then act according to the incoming information. If we pass some information that don't fit the schema metadatas, we will get an error telling us it doesn't understand a specific property.
We can put whatever we want as long as it fits in, a bit like this:

In this tutorial, we will see what's the current solution for this issue.
We will start slowly to get in the groove with a simple Angular 6 configuration.
Angular 6 Builders
As stated before, no more ng eject command.
In order to use a custom Webpack configuration, we need an external plugin:
yarn add angular-cli-builders
If this plugin didn't exist, we would have a lot of trouble to customize our Ionic Webpack configuration, don't hesitate to go to the github repo to give some love.
We can go to the angular.json file and change the default configuration:
...
"architect": {
        "build": {
          "builder": "angular-cli-builders:custom-webpack-browser",
          "options": {
            "customWebpackConfig": {
              "path": "./extra-webpack.config.js"
            },
...
The first step is switching the builder line:
"builder": "@angular-devkit/build-angular:browser"
To:
"builder": "angular-cli-builders:custom-webpack-browser",
We don't need the Angular 6 devkit anymore.
Instead we use the angular-cli-builders to pass a path toward an extra webpack configuration file.
We started with the build target, however, when we run the ionic serve command, we target the serve environment.
We scroll down a bit to reach the serve target and replace:
"builder": "@angular-devkit/build-angular:dev-server",
With:
"builder": "angular-cli-builders:generic-dev-server",
The extra-webpack.config.js is located in the root folder next to the angular.json file, which is a very simple file:
console.log('The custom config is used');

module.exports = {
  resolve: {},
  module: {}
}
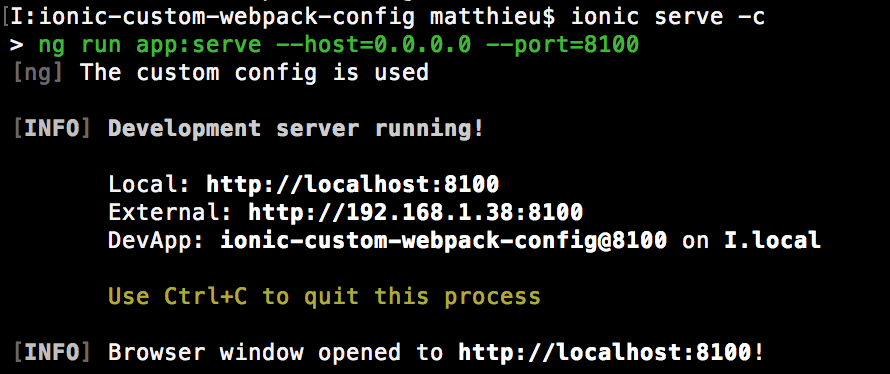
This phase is just a milestone, our goal is to have the console.log printed. The extra module here doesn't have any custom configuration, if we want to add some loaders, rules, etc., this is the right place.
Our first result should bring us to this:
The Ionic Webpack Custom Configuration
That's great for Angular 6, however, Ionic 4 has its own target and schemas.
When we launch an:
ionic cordova run ios
It will target the ionic-cordova-serve environment, so we need to update the angular.json file for this specific target:
...
 "ionic-cordova-serve": {
   "builder": "angular-cli-builders:generic-dev-server",
Then we can launch our Ionic application on a device:
ionic cordova run ios --device -lcs
Here we should have an error like:
Data path “” should NOT have additional properties ...
As stated at the beginning of this tutorial, builders use schemas.
The angular-cli-builders plugin is oriented toward Angular 6 schemas.
We need to either modify it by hand or download an npm package that already has an Ionic oriented schema.
I have already done one, so you can grab it:
yarn add angular-ionic-cli-builders -s --only=dev
If you want to do it yourself, we will go through the procedure in a minute.
Once we have the package installed, we go back to the angular.json file and use it as follow:
"ionic-cordova-build": {
          "builder": "angular-ionic-cli-builders:generic-dev-server",
          "options": {
            "browserTarget": "app:build"
          },
          "configurations": {
            "production": {
              "browserTarget": "app:build:production"
            }
          }
        },
        "ionic-cordova-serve": {
          "builder": "angular-ionic-cli-builders:generic-dev-server",
          "options": {
            "cordovaBuildTarget": "app:ionic-cordova-build",
            "devServerTarget": "app:serve",
            "browserTarget": "app:build"
          },
          "configurations": {
            "production": {
              "cordovaBuildTarget": "app:ionic-cordova-build:production",
              "devServerTarget": "app:serve:production"
            }
          }
        }
The builder's target is the same as before (generic-dev-server), we just overrode the default configuration.
The ionic-cordova-serve target is the one that Ionic uses when we run an application, however, since we already have our hands dirty, we take the opportunity to replicate the changes to the ionic-cordova-build target for the build command.
Once we are done configuring, we can run the application on a device:

Our own builder
If using another npm package is not an option, we can go to the node-modules/angular-cli-builders folder:

We just need to grab the Ionic 4 cordova schema information that the angular-cli-builders doesn't have:
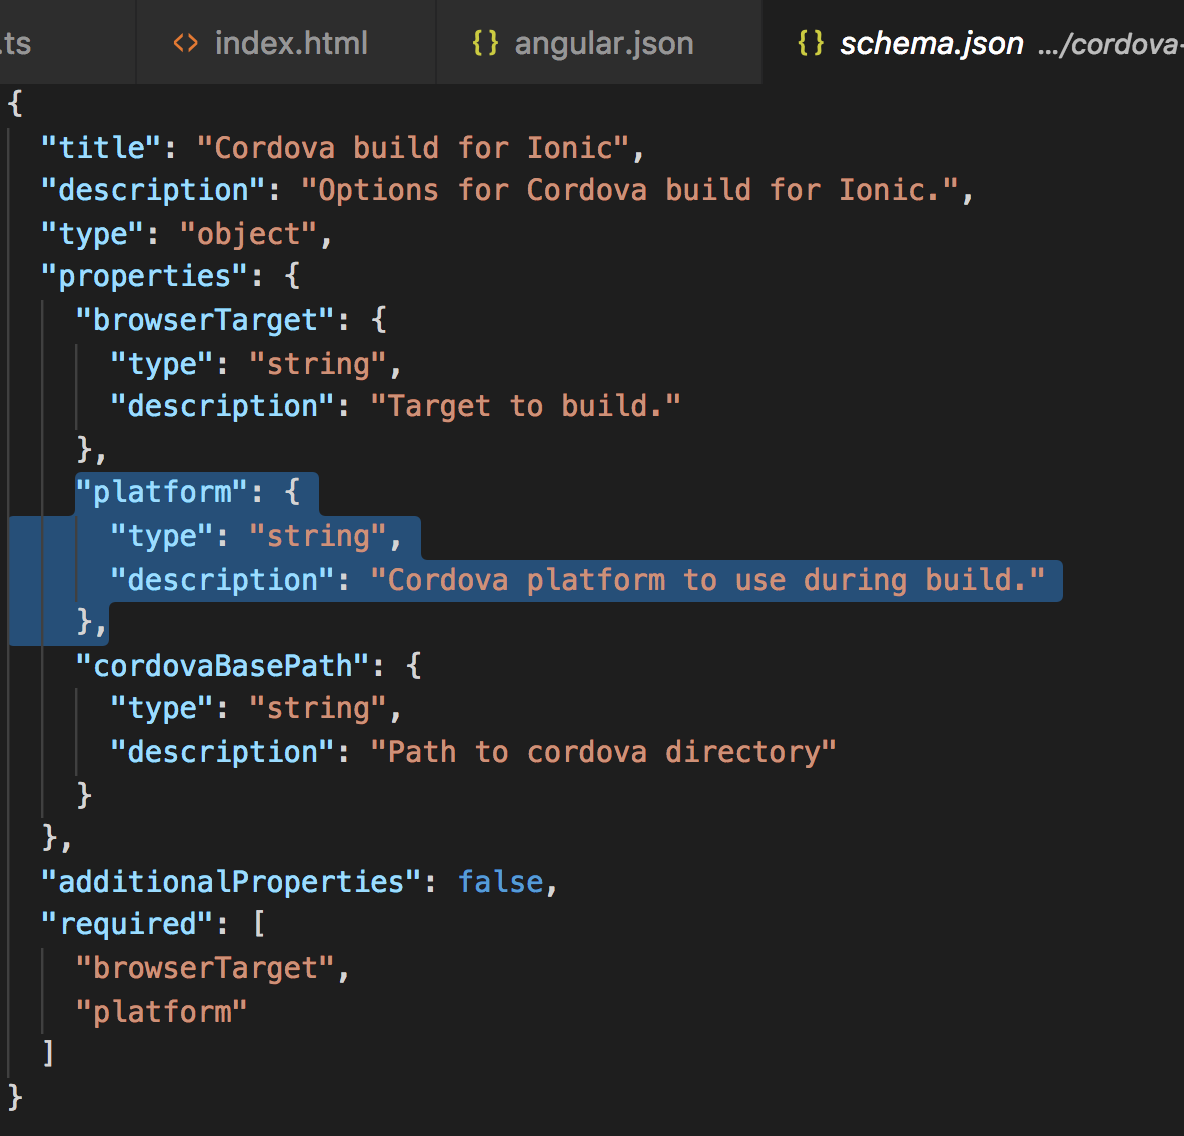
Yep just copy paste the browserTarget, platform and cordovaBasePath config in the angular-cli-builders/src/generic/dev-server/schema.json file and here we have our builder configuration updated for Ionic 4.
Conclusion
The builders, schemas mechanism introduced in Angular 6 can be quite advanced and it does make sense!
Having the possibility to switch between multiple builders can be quite nice for multi-client projects.
We don't have yet access to an easy way for adding our own sauce, it's either modifying the file in the node_modules folders or we can just fork the angular-cli-builders plugin and create our own npm package.