


Analyzing the Ionic AWS Full-Stack Starter: Configuration and Providers
I have used both Ionic and AWS for years now. Both technologies are (mostly) free and awesome.
Ionic is the badass framework to build cross-platform mobile applications and AWS gives us the tools to host, cache, manipulate files with authentication and many more services in the cloud.
So what's the result if both companies allied together to create a project: the Ionic AWS Starter!
Until now, I have only used the S3 service so this stack gave me a new look at AWS potential.
The AWS Mobile Hub
Instead of creating the backend in Java, Ruby or Node.js, AWS offers some services that can be easily configured by clicking some buttons.
Those services are centered in one place: the Mobile Hub.
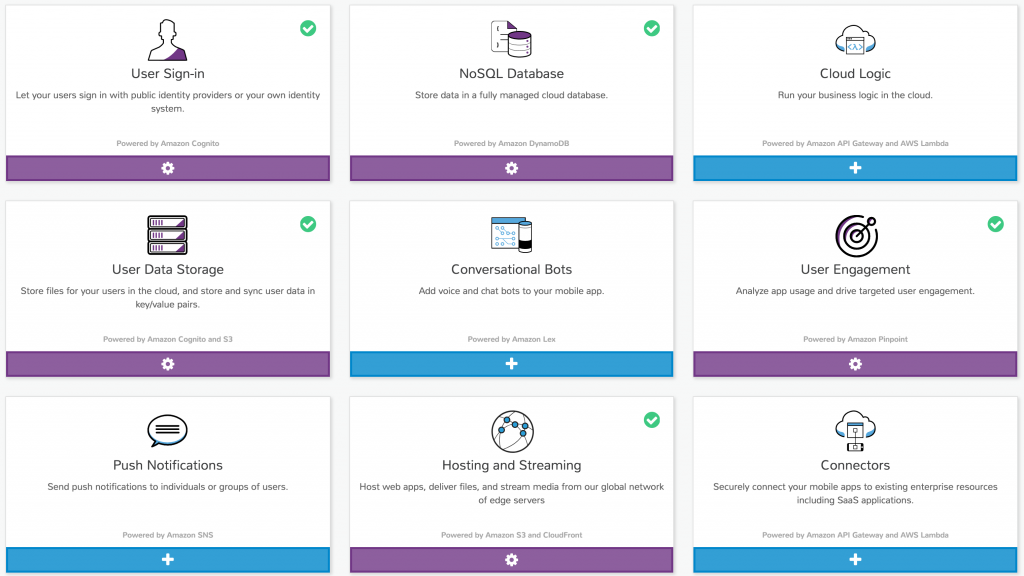
As you can see from this picture, there are nine types of services. Only five are used in our stack:
- Authentication
- NoSQL Database
- User Data Storage
- User Engagement
- Hosting and Streaming
As I said before, most of those services can be activated with just one click:
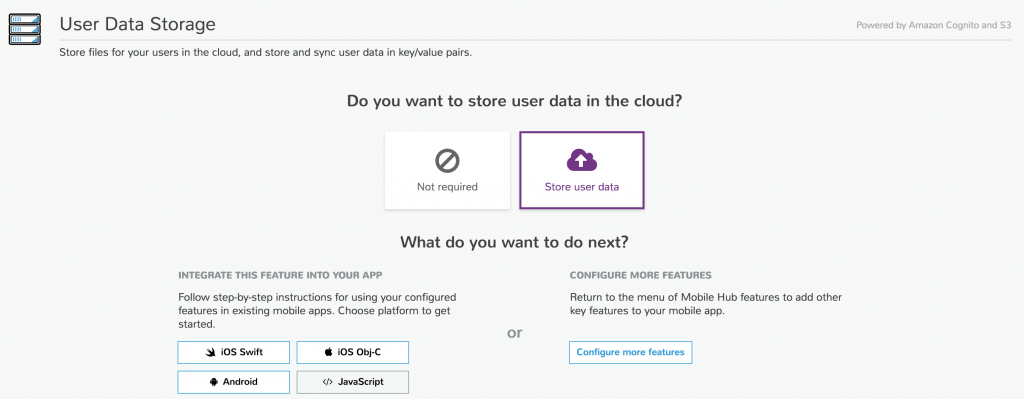
We can start from zero, add the services one by one or import them, which brings us back to the starter project.
The installation instructions are available there. (You might have to configure your AWS credentials, to avoid this, I manually downloaded the aws-config.js file)
The Ionic project already have a mobile-hub-project.zip file that contains a configuration for the Mobile Hub, so most of the work is already done for us.
If we unzip the file, we can have a look at the yaml configuration:
--- !com.amazonaws.mobilehub.v0.Project
features:
  content-delivery: !com.amazonaws.mobilehub.v0.ContentDelivery
    attributes:
      enabled: true
      visibility: public-global
  database: !com.amazonaws.mobilehub.v0.Database
    components:
      database-nosql: !com.amazonaws.mobilehub.v0.NoSQLDatabase
        tables:
          - !com.amazonaws.mobilehub.v0.NoSQLTable
            attributes:
              description: S
              created: N
              taskId: S
              category: S
              userId: S
            hashKeyName: userId
            hashKeyType: S
            indexes:
              - !com.amazonaws.mobilehub.v0.NoSQLIndex
                hashKeyName: userId
                hashKeyType: S
                indexName: DateSorted
                rangeKeyName: created
                rangeKeyType: N
            rangeKeyName: taskId
            rangeKeyType: S
            tableName: ionic-mobile-hub-tasks
            tablePrivacy: private
  mobile-analytics: !com.amazonaws.mobilehub.v0.Pinpoint
    components:
      analytics: !com.amazonaws.mobilehub.v0.PinpointAnalytics {}
      messaging: !com.amazonaws.mobilehub.v0.PinpointMessaging {}
  sign-in: !com.amazonaws.mobilehub.v0.SignIn
    attributes:
      enabled: true
      optional-sign-in: true
    components:
      sign-in-user-pools: !com.amazonaws.mobilehub.v0.UserPoolsIdentityProvider
        attributes:
          alias-attributes:
            - email
          mfa-configuration: OFF
          name: userpool
          password-policy: !com.amazonaws.mobilehub.ConvertibleMap
            min-length: "8"
            require-lower-case: true
            require-numbers: false
            require-symbols: false
            require-upper-case: false
  user-files: !com.amazonaws.mobilehub.v0.UserFiles
    attributes:
      enabled: true
  user-profiles: !com.amazonaws.mobilehub.v0.UserSettings
    attributes:
      enabled: true
name: Ionic Mobile Hub Starter
region: us-east-1
This configuration is very concise. We only need 60 lines to create five features. Not bad right?
Let's focus on the sign-in feature, the attributes will specify the type of authentication (ex: email), how strong the password should be or if signing in is optional or required.
Taking a step back, the authentication is designed on the backend (the Mobile Hub) to be optional.
When launching our app:

This doesn't look optional 🤔.
Aside from that, what does the mobile app do?
In a nutshell, it allows a user to create an account, connect, add some tasks, change its profile picture and disconnect.
Those actions cover a good spectrum of use cases showcasing the use of:
- AWS S3 for stocking the profile picture
- Cognito for authentication
- DynamoDB for stocking the tasks details
- Ionic Native for the use of the camera
The architecture is as follow:
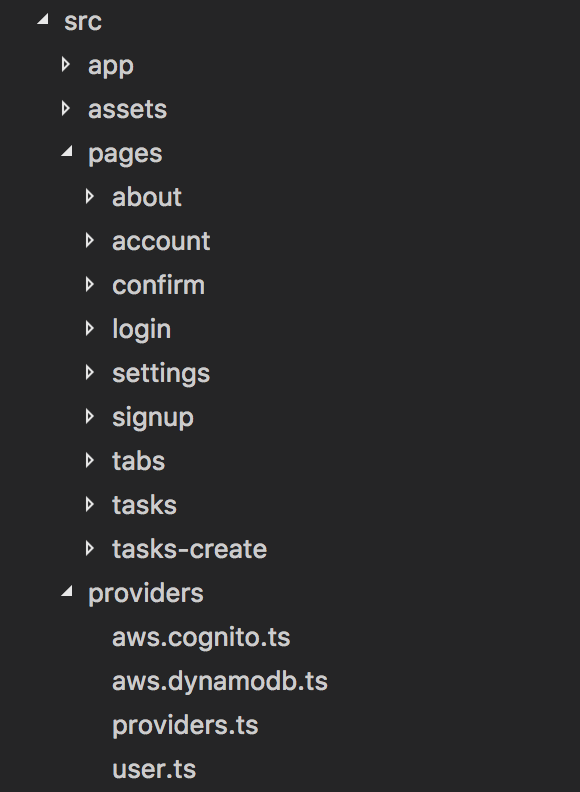
Nothing new about the pages, each feature is separated in its own folders.
Provider wise, every AWS Services are available in the providers folder: Cognito, DynamoDb and User.
The providers.ts file exports those services:
import { Cognito } from "./aws.cognito";
import { DynamoDB } from "./aws.dynamodb";
import { User } from "./user";

export { Cognito, DynamoDB, User };
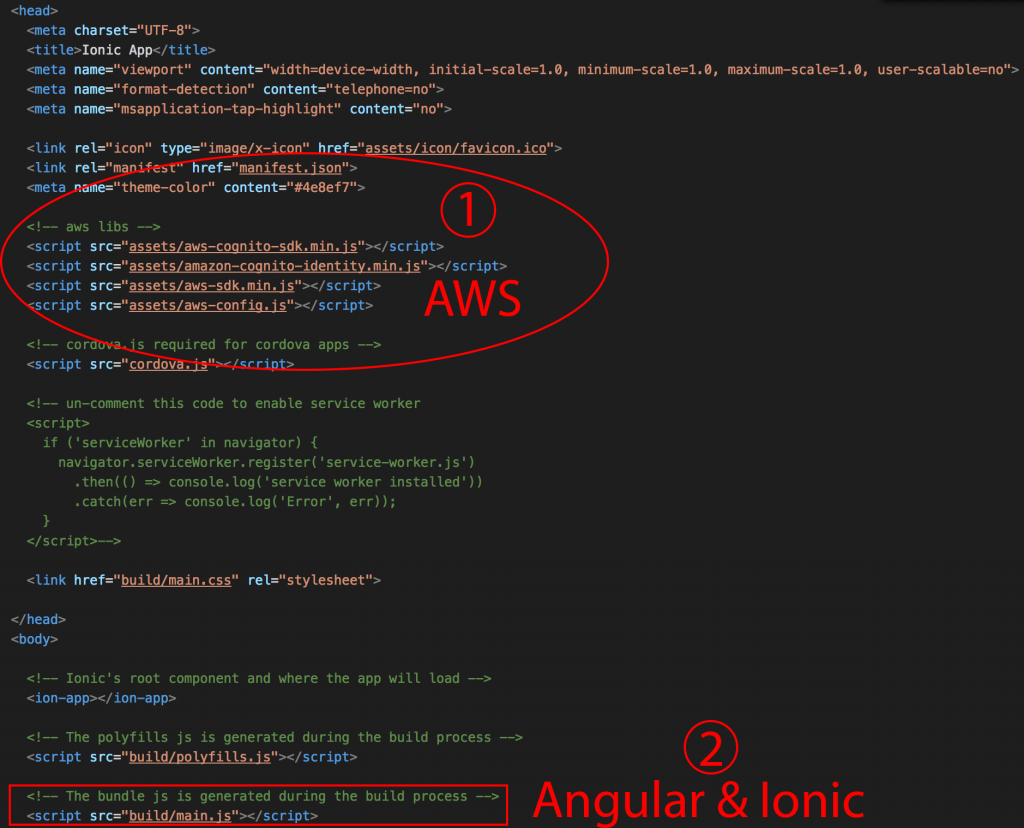
Special mention to the assets folder which contains the AWS libraries:
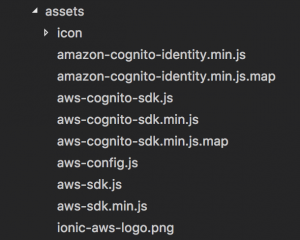
Why not using the package.json to acquire those files?
Two possible reasons:
- They use a custom AWS version, different from the public one
- They want AWS to be loaded before other Angular and Ionic files, in the index.html file:
Aside from the AWS core libraries, the aws.config.js file is very important, this file sets multiple global constants that will be used for configuration like the region, the bucket, etc.
Those constants are then acquired in the app.config.ts file:
import { Injectable } from '@angular/core';

declare var AWS: any;
declare const aws_mobile_analytics_app_id;
declare const aws_cognito_region;
declare const aws_cognito_identity_pool_id;
declare const aws_user_pools_id;
declare const aws_user_pools_web_client_id;
declare const aws_user_files_s3_bucket;

@Injectable()
export class AwsConfig {
  public load() {

    // Expects global const values defined by aws-config.js
    const cfg = {
      "aws_mobile_analytics_app_id": aws_mobile_analytics_app_id,
      "aws_cognito_region": aws_cognito_region,
      "aws_cognito_identity_pool_id": aws_cognito_identity_pool_id,
      "aws_user_pools_id": aws_user_pools_id,
      "aws_user_pools_web_client_id": aws_user_pools_web_client_id,
      "aws_user_files_s3_bucket": aws_user_files_s3_bucket
    };

    AWS.config.customUserAgent = AWS.config.customUserAgent + ' Ionic';

    return cfg;
  }
}
Note the:
declare var AWS: any;
We will encounter this again and again and again in this project.
Typically, this could have been placed once and for all in a declaration.d.ts file in order to be available everywhere.
The app.module.ts file is just business as usual, except:
IonicModule.forRoot(MyApp, new AwsConfig().load());
All our previous configurations are merged with Ionic's Config.
Moving on to the Providers.
Providers
Starting with the simplest one: DynamoDB.
Located in the aws.dynamodb.ts file:
import { Injectable } from '@angular/core';

declare var AWS: any;

@Injectable()
export class DynamoDB {

  private documentClient: any;

  constructor() {
    this.documentClient = new AWS.DynamoDB.DocumentClient();
  }

  getDocumentClient() {
    return this.documentClient;
  }

}
This Service creates the document client and an accessor.
The document client is our god object that will allow us to manipulate the database.
The documentation is there, with every traditional db commands: put, delete, get, query…
Followed by the Cognito service.
Located in the aws.cognito.ts file:
import { Injectable } from "@angular/core";
import { Config } from "ionic-angular";

declare var AWS: any;
declare var AWSCognito: any;
Which starts with some imports and declarations.
@Injectable()
export class Cognito {

  constructor(public config: Config) {
    AWSCognito.config.region = config.get('aws_cognito_region');
    AWSCognito.config.credentials = new AWS.CognitoIdentityCredentials({
      IdentityPoolId: config.get('aws_cognito_identity_pool_id')
    });
    AWSCognito.config.update({customUserAgent: AWS.config.customUserAgent});
  }
  .
  .
  .
}
In the constructor, we setup AWSCognito with the configuration we talked about earlier:
The region where the endpoints are located (ex: us-east-1)
The IdentityPoolId: A unique identifier pointing to the Cognito Service
The CustomUserAgent: In order to avoid user agent filters (ex: bot defense), the user agent is set to “MobileHub v0.1”
Followed by the getUserPool method:
  getUserPool() {
    let self = this;
    return new AWSCognito.CognitoIdentityServiceProvider.CognitoUserPool({
      "UserPoolId": self.config.get('aws_user_pools_id'),
      "ClientId": self.config.get('aws_user_pools_web_client_id')
    });
  }
Setting up the access to AWSCognito’s user pool.
Important workaround here, the this object is stocked in another variable named self in order to keep it available in the CognitoUserPool method.
Let’s avoid the confusion!
The UserPoolId represents where the clients are stocked whereas the ClientId authenticates applications that connect to this user pool:
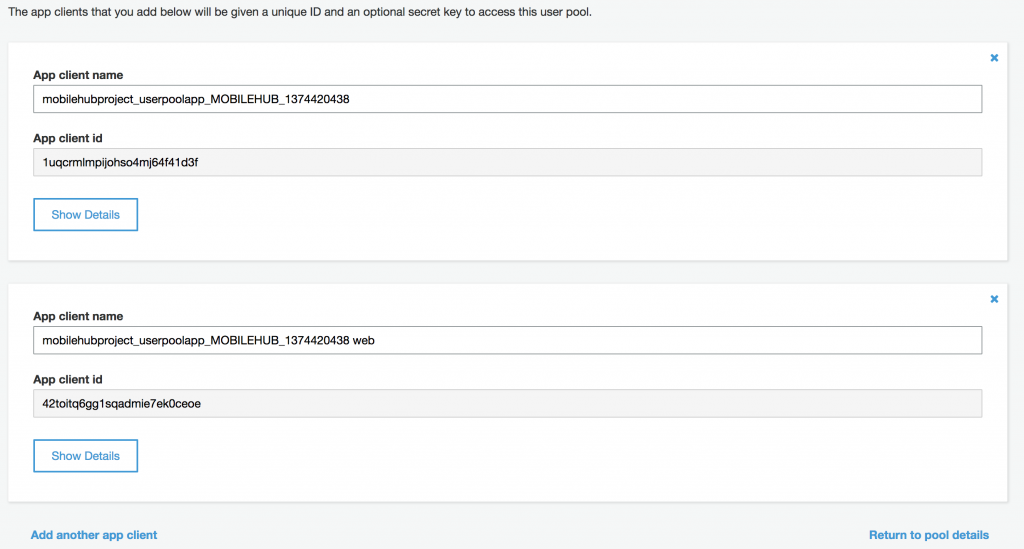
Those ids are available in the mobile-hub-project.yml configuration file and on the AWS Mobile Hub webpage.
Once we have access to the user pool, we can:
- Access a user from the pool:
  makeUser(username) {
    return new AWSCognito.CognitoIdentityServiceProvider.CognitoUser({
      'Username': username,
      'Pool': this.getUserPool()
    });
  }
- Get the current user:
  getCurrentUser() {
    return this.getUserPool().getCurrentUser();
  }
- Create authentication data:
  makeAuthDetails(username, password) {
    return new AWSCognito.CognitoIdentityServiceProvider.AuthenticationDetails({
      'Username': username,
      'Password': password
    });
  }
- Create a user attribute:
  makeAttribute(name, value) {
    return new AWSCognito.CognitoIdentityServiceProvider.CognitoUserAttribute({
      'Name': name,
      'Value': value
    });
  }
We are now done with the Cognito Service.
Moving on to the last one: the User Service.
This Service will use the Cognito Service’s methods.
import { Injectable } from '@angular/core';
import { Config } from 'ionic-angular';

import { Cognito } from './providers';

declare var AWS: any;

@Injectable()
export class User {

  private user: any;
  public loggedIn: boolean = false;

  constructor(public cognito: Cognito, public config: Config) {
    this.user = null;
  }
  .
  .
  .
}
Two interesting properties here:
- user: Will stock the Cognito user once logged in
- loggedId: A simple flag (not yet used)
Some accessors:
  getUser() {
    return this.user;
  }

  getUsername() {
    return this.getUser().getUsername();
  }
The registration part:
  register(username, password, attr) {
    let attributes = [];

    for (var x in attr) {
      attributes.push(this.cognito.makeAttribute(x, attr[x]));
    }

    return new Promise((resolve, reject) => {
      this.cognito
        .getUserPool()
        .signUp(username, password, attributes, null, function(err, result) {
        if (err) {
          reject(err);
        } else {
          resolve(result.user);
        }
      });
    });
  }
When a user registers, its attributes (name, address, etc.) must go through some transformations in the makeAttribute method.
A Promise is returned so the flow can progress.
Then the user is signed up to the user pool. Finally, if everything is good, the user is returned.
If the user forgot its registration code:
  resendRegistrationCode(username) {
    return new Promise((resolve, reject) => {
      let user = this.cognito.makeUser(username);
      user.resendConfirmationCode((err, result) => {
        if (err) {
          console.log('could not resend code..', err);
          reject(err);
        } else {
          resolve();
        }
      });
    });
  }
Using the username, the makeUser method is used to grab the matching user then the built-in resendConfirmationCode method is used (we didn’t code this one, many methods come from the Cognito user object #profit).
Once the user has the code:
   confirmRegistration(username, code) {
    return new Promise((resolve, reject) => {
      let user = this.cognito.makeUser(username);
      user.confirmRegistration(code, true, (err, result) => {
            if (err) {
              console.log('could not confirm user', err);
              reject(err);
            } else {
              resolve(result);
            }
        });
    });
  }
Same as before, the makeUser method gives us the Cognito user and we check if the code is good by using the confirmRegistration method.
More code in the login method:
  login(username, password) {
    return new Promise((resolve, reject) => {
      let self = this;
      let user = this.cognito.makeUser(username);
      let authDetails = this.cognito.makeAuthDetails(username, password);

      user.authenticateUser(authDetails, {
        'onSuccess': function(result) {
          var logins = {};
          var loginKey = 'cognito-idp.' +
                          self.config.get('aws_cognito_region') +
                          '.amazonaws.com/' +
                          self.config.get('aws_user_pools_id');
          logins[loginKey] = result.getIdToken().getJwtToken();

          AWS.config.credentials = new AWS.CognitoIdentityCredentials({
           'IdentityPoolId': self.config.get('aws_cognito_identity_pool_id'),
           'Logins': logins
          });

          self.isAuthenticated().then(() => {
            resolve();
          }).catch((err) => {
            console.log('auth session failed');
          });
        },

        'onFailure': function(err) {
          console.log('authentication failed');
          reject(err);
        }
      });
    });
  }
The login method will get the user matching the username.
It will compare it to the information from authDetails using the authenticateUser method.
If everything is good, we receive a result that contains a token.
The loginKey string can be scary, but in the end it’s just a path to the user pool located in our region.
This path is associated to the token we received. Using this path and our Cognito’s IdentityPoolId, we can now set the credentials for AWS.
Those credentials will automatically be added to our future requests.
The final touch is the isAuthenticated method:
  isAuthenticated() {
    var self = this;
    return new Promise((resolve, reject) => {
      let user = this.cognito.getCurrentUser();
      if (user != null) {
        user.getSession((err, session) => {
          if (err) {
            console.log('rejected session');
            reject()
          } else {
            console.log('accepted session');
            var logins = {};
            var loginKey = 'cognito-idp.' +
              self.config.get('aws_cognito_region') +
              '.amazonaws.com/' +
              self.config.get('aws_user_pools_id');
            logins[loginKey] = session.getIdToken().getJwtToken();

            AWS.config.credentials = new AWS.CognitoIdentityCredentials({
              'IdentityPoolId': self.config.get('aws_cognito_identity_pool_id'),
              'Logins': logins
            });

            self.user = user;
            resolve()
          }
        });
      } else {
        reject()
      }
    });
  }
First we grab the current user, if he does exist, we look if we can get a session.
Once again the loginKey variable is created. This time the token comes from the session itself.
Finally, the user is stocked in the user property of the User Class.
Remember, this one:
@Injectable()
export class User {

  private user: any;
  .
  .
  .
}
Let’s not forget the logout method!
  logout() {
    this.user = null;
    this.cognito.getUserPool().getCurrentUser().signOut();
  }
Cleaning up our local user and signing out the user from Cognito’s user pool.
And Voila we are done with our Providers!
Conclusion
In this tutorial we have seen the most complex parts of the application: AWS configuration and Providers creation.
The rest of the application will use those parts in order to communicate with the AWS Services to handle the users, the tasks and the profile pictures.
The AWS Mobile Hub is super cool to use!
It’s the first time that I can configure so many complex services by only using a few clicks. In the next tutorial we will have a look at how the Providers are integrated into the application’s business logic.
Until next time.