


Using Ionic With Capacitor in One Go
To understand why Capacitor was created, we have to go back in time.

It all started with a new technology called Ionic.
The mission was to bring the web to the mobile world by using HTML, CSS, JavaScript and that was a success!
However, it wasn't enough.
The next goal was to bridge both worlds together allowing a user to surf the Web then save the website to use it offline as a mobile application: the PWA.
That was great, however, one thing was missing.
Ionic developers are used to using native Cordova plugins to access the device's features.
This was generally not possible with Cordova in a PWA and a big hole was still there to fill.
Enter Capacitor!
Capacitor's goal is to bring all those plugins back to the web and create a technology breakthrough: Native Progressive Web Apps (NPWA).
In this tutorial, we will take a look at how we can use a Capacitor plugin in an Ionic application.
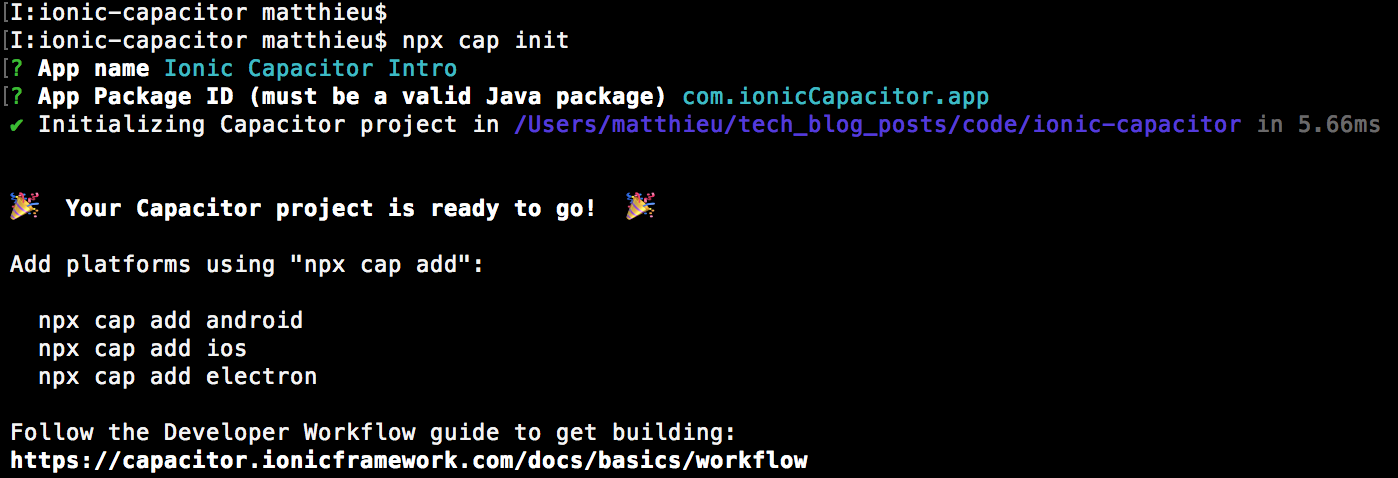
We start by creating an Ionic application:
ionic start ionic-capacitor-intro blank
Remember, we don't need Cordova because we will use Capacitor!
We install Capacitor:
npm install --save @capacitor/cli @capacitor/core
Now that we have everything installed, it's time to code.
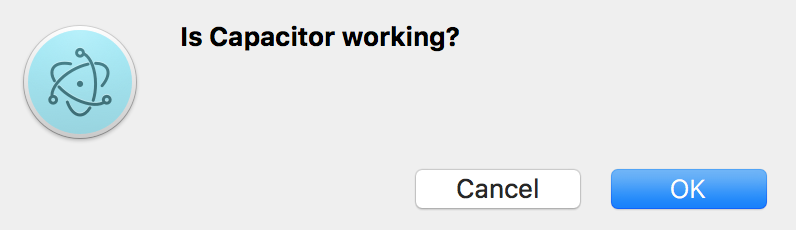
Our objective is to simply call a confirm modal.
We start with the home.ts file:
import { Plugins } from '@capacitor/core';

const { Modals } = Plugins;
.
.
.
We use ES6 destructuring to acquire the Modals plugin from Capacitor and we use it to create a showConfirm method:
  async showConfirm() {
    await Plugins.Modals.confirm({
      title: 'Capacitor integration test',
      message: 'Is Capacitor working?'
    });
  }
The confirm method returns a Promise hence the async, await keywords.
We can now add a button in the home.html file to call our method:
<ion-content padding>
  <button (click)="showConfirm()" ion-button>
    Show confirm
  </button>
</ion-content>
And that's it, we have our Capacitor Modal working in our Ionic application!

Capacitor doesn't only bring NPWA to the table.
Before the arrival of Capacitor, in order to create an Electron application, we had to go through another lenghty Webpack configuration phase (#Parcel forever).
Now, we can just initialize the Capacitor configuration in the capacitor.config.json file:
Ask Capacitor to install Electron:
npx cap add electron
Copy the web content to the platform:
npx cap copy
And run the application on our desktop:
cd electron/
npm run electron:start
Hours of configuring Ionic + Webpack + Electron done in one minute, isn't that great?