Using Vue with Ionic 4 and Cordova Plugins
Ionic 4 is coming this year!
It either comes with no changes or big changes.
This will depend of you.
Ionic won't depend on Angular anymore. Thanks to Stencil, we will be able to use React, Vue, Ember, whatever we want!
This new feature, however, takes a lot of time to architect and develop (hence the unknown release date of Ionic 4). Angular-wise, we can expect little changes.
I have heard a lot of good things about how Vue is easy to learn and similar to AngularJS (not Angular).
Indeed, Vue can be considered the AngularJS 2.
I've decided to see how far this technology can go and start a new Ionic Vue course with this post! (don't worry about React, I will make another one for this technology)
In this tutorial, we will see how we can mix together Ionic, Vue and Cordova. We will use the Cordova CLI, in the next one, the Ionic CLI will be used.
Get The Ball Rolling
As usual, we start by creating the project:
cordova create ionic-vue
The required libraries will be added to the index.html file:
 <head>
   <script src="https://unpkg.com/vue"></script>
   <script src="https://unpkg.com/@ionic/[email protected]/dist/ionic.js"></script>

   .
   .
   .
unpkg.com is a service that serves libraries. We will use it to acquire Vue and Ionic's alpha version. This a cool service I discovered thanks to Paul Halliday's tutorial.
In order to access those libraries, we need to modify the meta tag:
<meta http-equiv="Content-Security-Policy"
content="default-src *; frame-src * gap://ready;
         style-src 'self' http://* 'unsafe-inline';
         script-src 'self' http://* 'unsafe-inline' 'unsafe-eval'" />
We are currently in the www folder where the application source code is located, we can run the application in the browser by using a NodeJS server like http-server.
The unpkg link contains references to Ionic Components located in different files:

We will use the Ion Card Component in this tutorial, looking at the core file:

The Ion Card Component is located in the ipnhdcsz.js file and we will see the file acquisition in Chrome's Network:

Ionic 4 is still in development, (compared to Ionic 3) there are very few Components available at the moment.
Now that Ionic and Vue are acquired, we can start coding:
<div id="app">
  {{salutation}}
</div>
We create a div with a "app" id, this will be Vue's root Component.
Just like Angular, we can use the brackets for interpretation. Here we want to display the salutation property.
We can move to the index.js file:
var app = new Vue({
  el: "#app",
  data: {
    salutation: "Hello from Vue"
  }
});
The original code from this file can be cleaned up.
We create a new Vue instance.
This instance will look for the app id and attach itself to its DOM element.
The instance's properties are declared in the data field, here we only want a salutation property.
This will give a first result:

The application can also run on a device:
cordova platform add ios
cordova run ios
Now that we got Vue working, we can focus on the Ionic 4 part.
Ionic and Geolocation
Let's start by adding the Geolocation plugin:
cordova plugin add cordova-plugin-geolocation
  --variable GEOLOCATION_USAGE_DESCRIPTION="To locate you"
And move to the template.
We will ask for the user's location and display it.
First we add a button:
        <button @click="getPosition()">
          Get Position
        </button>
When the click event is triggered, the getPosition method will be called. The "@" character is used to listen for events (we will see more about events in the next posts).
The presentation will be displayed in an Ionic Card Component:
        <ion-card>

          <ion-card-content>

            <div v-if="geolocation.latitude">
              You are located at: {{geolocation.latitude}}, {{geolocation.longitude}}
            </div>

            <div v-else-if="loadingPosition">
              Acquiring your position
            </div>

            <div v-else>
              Tap the button
            </div>

          </ion-card-content>

        </ion-card>
The v-if, v-else-if and v-else Directives will change the presentation according to the data we currently have.
If the geolocation property is populated, we will show the latitude and longitude.
If it's still loading, just a waiting message.
By default, we ask the user to tap the button to start the process.
We can go back to the index.js file:
Vue.config.ignoredElements = ["ion-card", "ion-card-content"];

var app = new Vue({
  el: "#app",
  data: {
    loadingPosition: false,
    geolocation: {}
  }
});
We start by telling Vue to ignore Ionic's elements.
The data field will now have the loadingPosition flag and an empty geolocation object.
The final touch, the methods field:
var app = new Vue({
  .
  .
  .
  methods: {
    getPosition: function() {
      this.loadingPosition = true;

      navigator.geolocation.getCurrentPosition(({ coords })=>{
        this.loadingPosition = false;
        this.geolocation = coords;
      });
    }
  }
})
We start by triggering the loadingPosition flag to show the loading message.
Cordova's Geolocation plugin is then used to get the current position.
The coords we received will go to the geolocation property and the loadingPosition flag is set to false.
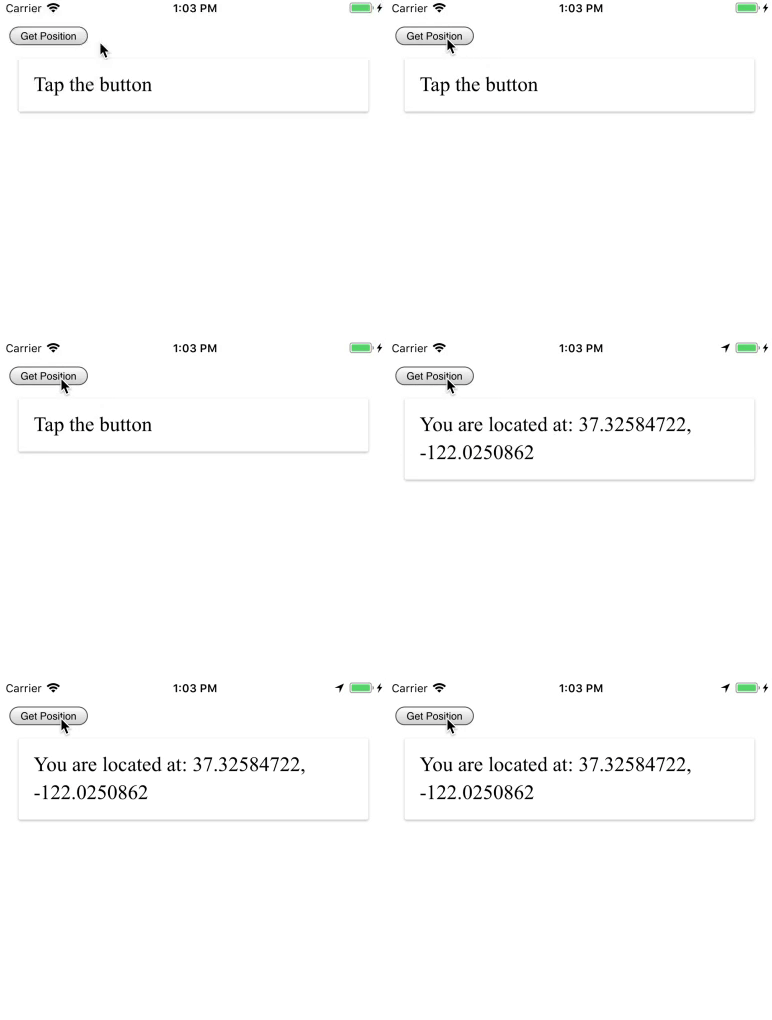
And Voila!
Our Ionic Vue Geolocation application is working on a device!

Conclusion
Ionic and Vue can work together!
Angular is not the only framework out there and Ionic will definitely profit from this starting this year.
No need to freak out, moving from Ionic 3 to Ionic 4 for Angular users will be a piece of cake.
However, learning other frameworks like Vue or React can bring some new perspectives and help strengthen the core principles.
At the end of the day, frameworks copy each other while bring theirs own innovations around the Component system … you will see this through this course.
In the next tutorial, we will see how we can use Ionic’s CLI to create our Ionic Vue application.


