


Using Vue as an Angular alternative for Ionic: Vuex in One Go
In the previous tutorial, we talked about Vertical Communication in an Ionic Vue application.
Today, we will adopt the Horizontal Perspective by using a State Management Pattern. This pattern consists in centralizing a State object in a Store, then sharing this Store to the Ionic Vue Components.
We will use the Vuex library to achieve one simple goal: creating a counter application.
Since we are using JavaScript, Redux is an alternative, however, Vuex is more beginner-friendly.
If you just joined the Ionic Vue club, you will have to take a look at a previous tutorial to bootstrap the core Ionic Vue application.
As usual, we start by adding the library:
npm i --save vuex
We can now go to the main.ts file to init Vue and Vuex:
import Vue from "vue";
import Vuex from "vuex";
Vue.use(Vuex);
Since we are using Webpack in our Ionic Vue stack, we need to link Vuex to Vue.
Once this is done, we can create the store:
const store = new Vuex.Store({
  state: {
    count: 0
  },
  mutations: {
    increment(state, payload) {
      state.count += payload;
    },
    decrement(state, payload) {
      state.count -= payload;
    }
  }
});
The store is quite simple.
It has an initial state which contains a count field initialized at 0 and some mutations that will modify the state of the store. We only need two mutations: increment and decrement.
These functions receive the state of the store and some payload. We will use the payload to modify the store's count value.
The Ionic Vue root instance can now be created:
var app = new Vue({
  el: "#app",
  store,
  methods: {
    incrementCounter: function() {
      this.$store.commit("increment", 1);
    },
    decrementCounter: function() {
      this.$store.commit("decrement", 1);
    }
  }
});
The store is added to the root instance, this will allow us to use it in any Ionic Vue component during future development.
The incrementCounter and decrementCounter methods will be triggered by some DOM events, these methods use the $store's commit method to trigger the mutations we previously defined. The commit method takes two parameters, the name of the mutation we want to trigger and a payload (1).
Moving now to the index.html file to finish the work:
<div id="app">
  <div>
    {{this.$store.state.count}}
  </div>

  <button @click="incrementCounter">
    Increment counter
  </button>

  <button @click="decrementCounter">
    Decrement counter
  </button>
</div>
As we have seen before, the count value is available in the this.$store.state property.
We only need two buttons to trigger the incrementCounter and decrementCounter methods.
That's all we need to have a working application:

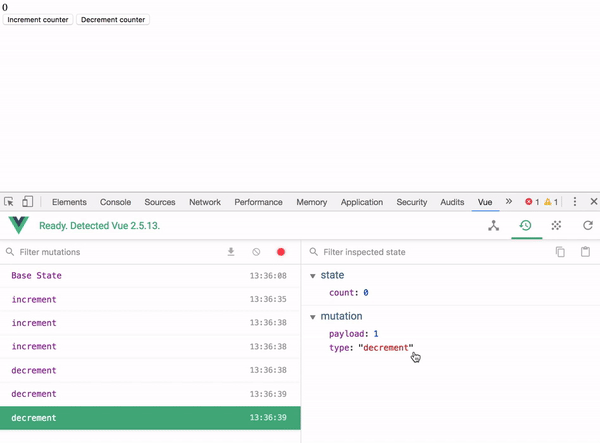
If we install the Vue extension for Chrome, we can see the evolution of the store and use the Time Machine feature to move between states:
Conclusion
A State Management System like Vuex is a double edged-sword.
If the Ionic Vue application is very simple, this technology might not be very useful and will be an overkill.
However, when the number of interactions between the Components increase, it's easier to debug them by going through the evolution of the Store, sometimes we find ourselves with a bug that is difficult to reproduce, with the Time Machine feature, it's not an issue anymore.