Adding Sounds using HTML5 and Native Audio in Ionic
'member Flash?

This is what we are going to use because it's the best technology in the world... just kidding.
Back in the days Flash was very helpful, we were able to make animations, audio players and so much more!
Then came HTML5 and people started wondering why they could watch their videos without crashes🤔.
Thanks to the HTML5 audio tag it's possible to create an audio player for a web application with four lines of code. As you already know, Ionic allows us to use HTML5 to build mobile applications, so we can use the HTML5 features!
HTML5 audio
First let's setup the audio files.
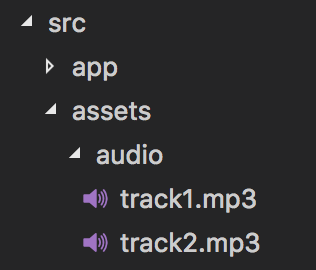
My tracks will be located in the src/assets/audio directory:

Note that it's also possible to use a remote url instead of a local file (in this case the file might take longer to load, you should add the preload attribute to the audio tag we will use a bit further).
Starting from scratch:
npm install -g ionic cordova @ionic/cli-plugin-cordova
ionic start myApp blank
Anticipating here and adding Cordova for the second part of this tutorial.
Let's update the home.html file:
<ion-content padding>
  <div>
    <audio controls>
      <source src="assets/audio/track1.mp3" type="audio/mpeg">
      Your browser does not support the audio element.
    </audio>
  </div>
</ion-content>
This is the simplest way to create an audio player: the HTML5 <audio> Element.
The audio tag is a standard, it possesses a lot of features you can harness (documentation here).
In this example the controls attribute adds more HTML Elements to allow the user to play, pause, move forward, etc.
If we just want the sound like a background music for example, it's possible to remove the controls attribute, add a reference to the <audio> tag:
<audio #audio>
And move to the home.ts file to finalize the work:
import { Component, ViewChild } from '@angular/core';
.
.
.
export class HomePage {
  @ViewChild("audio") audio;
  .
  .
  .
}
Starting by using ViewChild to grab the Audio Element from the DOM.
A bit further:
export class HomePage {
  .
  .
  .

  ngAfterViewInit() {
    this.audio.nativeElement.oncanplaythrough = () => {
      alert("Can play through video without stopping");
      this.audio.nativeElement.play();
    };
  }
}
To be sure that everything is loaded, the code will be located in the ngAfterViewInit hook.
We are looking for the oncanplaythrough callback. This callback is triggered when the audio can be played all the way through, which is very useful if the user has a bad internet connection and the audio is loading very slooooooowwww.
Once the audio is ready, the play method is used and the background music is rolling!
However, it's not great to have a useless HTML5 element in the DOM.
If the music is all you care about, it's possible to use the standard Audio Class:
export class HomePage {
  // @ViewChild("audio") audio;
  constructor() {
    var audio = new Audio("assets/audio/track1.mp3");
    audio.play();
  }
}
HTML5 is awesome. However, Cordova added a Native Audio Plugin.
Why?
Here are some reasons:
- Older versions of mobile platforms aren't always HTML5-friendly
- More functionalities were required (mono, stereo, etc.)
- Using Native features improves the performances which fixes some Android devices' latency issues with HTML5 Audio
Let's implement this solution with Ionic.
Ionic Native Audio
Starting with the installations:
ionic cordova plugin add cordova-plugin-nativeaudio
npm install --save @ionic-native/native-audio
The Ionic Native Audio plugin is imported in the app.module.ts file:
import { NativeAudio } from '@ionic-native/native-audio';

@NgModule({
  .
  .
  .,
  providers: [
    .
    .
    .
    NativeAudio
  ]
})
Let's take a step back to analyze what we can do.
Ionic Native Audio offers two types of preloading: simple and complex.
The simple method is ... simple. It should be used for short duration sounds (five seconds) like beeps, bangs sounds.
The complex one offers much more:
- Possibility to loop, pause, change the volume
- Adding some delay to create some cool fade in effects
- Handling multiple channels
The last one is more suited to our case: a background music.
We can now preload our track in the home.ts file:
import { NativeAudio } from '@ionic-native/native-audio';
.
.
.
export class HomePage {
  constructor(public nativeAudio: NativeAudio) {
    nativeAudio
      .preloadComplex('track1', 'assets/audio/track1.mp3', 1, 1, 0)
      .then(this.onSuccessPreloading, this.onError);
  }
}
The preloadComplex method will create a complex track that will have a unique identifier named 'track1', once the operation is done, the onSuccessPreloading method will be used:
onSuccessPreloading = data => {
  console.log("success preloading", data);
  this.nativeAudio.play("track1").then(this.onSuccessPlaying, this.onError);
};
Using the play method and the identifier 'track1', the sounds from track1.mp3 are rolling.
This play method can also accept a callback to use once the track is done playing, more information in the official documentation.
The audio file will stay in memory, so we need to clean up otherwise it will create a memory leak:
  ngOnDestroy() {
    this.nativeAudio.unload('track1');
  }
The ngOnDestroy hook will clean up by summoning the unload method with the corresponding identifier.
Conclusion
Adding some sounds in an Ionic application is quite easy and it should be!
The only task you should worry about is unloading the tracks at the right place and the right moment, here it's done in the ngOnDestroy method, however, depending of your application it could be done somewhere else. If you are confident that your users will have top-notch devices, you can go with HTML5 Audio. If not, you can use the Ionic Native Audio plugin because it’s built on Cordova which uses the Native Components of the device. Cordova is a solid technology, the audio feature has been tested for years so it’s a robust choice.


